Thursday, March 23, 2017

Steps for Yellowfin BI Installation (Developer Version)

Steps for Yellowfin BI Installation (Developer Version)

Following are the steps to install Yellowfin BI tool on Windows platform.

Prerequisites:
1) JRE version 1.6 or higher to install Yellowfin 7.3
2) Database (HSQL for testing/learning purpose only)
3) Yellowfin License ( https://www.yellowfinbi.com/ -- click on Try it Free & provide details to get license copy in your inbox )

Step 1: Select Language


Step 2: Installer home page


Click on Next button & accept the terms of license agreement to proceed.


Step 3: Select the packs to install.
a) Tutorial Content: Ski Team sample data, views, reports and dashboards.
b) Audit content: This pack contains views, dashboards and reports to explore various aspects of your Yellowfin instance, including administration items, content usage and user metrics.
c) World Countries Pack: This GeoPack provides geometry for every country on Earth.
d) US Zip Code Pack: This GeoPack provides geometry for states, counties and zip codes in the United States.


Step 4: Provide the license file.
If you don’t have download it from yellowfin official site. https://www.yellowfinbi.com/ -- click on ‘Try it Free’ & provide details to get license copy in your inbox


Step 5: Web Service Port & Web services
Provide the web service port (Let it be default) & Click on “Install Window service”.


Step 6: Select the Database type
Here it’s selected HSQLDB – it’s embedded with Yellowfin software. This type of installation for learning purpose only not for production.


Step 7: Installation is in progress.


Step 8: Installation Done, Yellowfin installed now.


 Installation successfully completed. Thank You !

Thursday, March 9, 2017

Configure Timeout Settings for Database Connection in Yellowfin BI

Configure Timeout Settings for Database Connection in Yellowfin BI

Usually timeout session error occurred when user session open long time & is then application close.

There are 3 timeout configuration options to consider;
1) Connection to Data source
2) Connection to the Yellowfin DB
3) Timeout setting on your Source instance (Out of scope Yellowfin).

Connection to Data Source:
Go to Administration -> Admin Console -> Data Source -> Connection (select data source)
Change Timeout Count: By default it is 180 seconds (3 min) & now changed to 480 seconds (8 min). You can change more than these seconds.


Connection to the Yellowfin DB:

Change the settings of yellowfin application file. The file is found in <Yellowfin directory>/appserver/webapps/ROOT/WEB-INF/web.xml.

Add following code:

<init-param>
<param-name>JDBCTimeout</param-name>
<param-value>1800</param-value>
</init-param>

Example:


Note: Prior to doing this activity please take backup of file.

Thursday, January 12, 2017

Freehand SQL Field in Yellowfin BI Report

Freehand SQL Field in Yellowfin BI Report

Freehand SQL allows you to build a calculation/manipulation by writing the SQL.

·         In Yellowfin 7.0 version, you cannot to use a Freehand SQL field as a Filter in Report.(It may enhanced in future release)
·         If you want to use Freehand SQL field as a Filter you may need to explore ‘Custom Function’ or ‘Virtual Table’ in Yellowfin View.
·         Calculated fields are not allowed in Freehand SQL view.
·         SELECT, FROM, or WHERE clause not allowed here, directly use SELECT fragment of SQL.
·         Aggregate functions (AVG, MAX, MIN, SUM and COUNT) should not be used.

Step 1: Suppose we want to display initial letter of ‘Agency Type’ values,Online – O & Agency – A. Go to Ski Team View & Edit it.


Step 2: Drag Dimension from Calculated Fields -> Freehand SQL


Step 3: Write required logic in Formula, here “SUBSTRING(TRAVELAGENCY.AGENCYTYPE,1,1)” then Save & Activate.
You may use CASE..WHEN or any logic as per requirement.

Note: No SELECT, FROM or WHERE clause & No Aggregated Functions


Step 4: Drag the Freehand SQL field in Report & Run.


Thank You!

Monday, December 26, 2016

How to Recover Yellowfin BI 'Deleted' Reports

How to Recover Yellowfin BI 'Deleted' Reports


Sometimes reports may deletes accidentally, in general no reports physically deleted from the metadata of database.

Check the status of report from “ReportHeader” table from Yellowfin metadata database.
select ReportName, ReportStatusCode from [dbo].[ReportHeader] where ReportName =<<reportname>>

If report deleted then status would be “DELETED”.Following are the steps to recover the deleted report.

1) I have the report name “Report Dummy” & now I’m going to delete it.
Prior to Delete


After Deletion:


2) To recover the deleted report, update the ReportStatusCode=’OPEN’


3)  Check the report in Report Folder.


 Thank You !


Thursday, December 22, 2016

Multiple tabs/browser for same user in Yellowfin BI

Multiple tabs/browser for same user in Yellowfin BI

By default Yellowfin BI able to open single browser only for same user, to open the multiple browser for same user, We need to disable the “Cookies” (Cookies=false) but this will work to open multiple browser only you can’t do multiple activities on single user login.

Go to Yellowfin Application Server: /appserver/conf/Catalina/localhost/ROOT.xml

Change cookies to false

<?xml version="1.0" encoding="UTF-8"?>
<Context docBase="D:\MBA\Yellowfin/yellowfin.war" path=""
   privileged="false" reloadable="false" swallowOutput="false" useNaming="true"
   xmlValidation="false" xmlNamespaceAware="false" xmlBlockExternal="false" cookies="false">
  <Manager className="org.apache.catalina.session.PersistentManager" distributable="false" saveOnRestart="false">
    <Store className="org.apache.catalina.session.FileStore" />
  </Manager>
</Context>


Note: Take backup prior to this activity

Wednesday, December 21, 2016

Stopping Auto-Refresh of Yellowfin BI Reports


Stopping Auto-Refresh of Yellowfin BI Reports

While building the report with multiple columns, arranging columns orderly or even simple change in report takes lot of time for report data preview.

So to address this, just “OFF” Report Data Preview & Chart Data Preview (If charts there in report)


After “OFF” the report setting, it asks “Refresh Option” to preview the data.


You can also minimize the Count of “Active Row Limit” & Turn-Off the “Auto Refresh”


Cheers, Enjoy!


Wednesday, December 7, 2016

How to change Yellowfin View for an Existing Report


How to change Yellowfin View for an Existing Report

Suppose I want to change Yellowfin View for an existing report to New Yellowfin View.

Ex: Report name is "Agency Sales by Profitability" & Yellowfin View name is "Agency_View". I have created New Yellowfin View i.e. "Agency_Sales_View" & now I would like to access this report from newly created Yellowfin View.

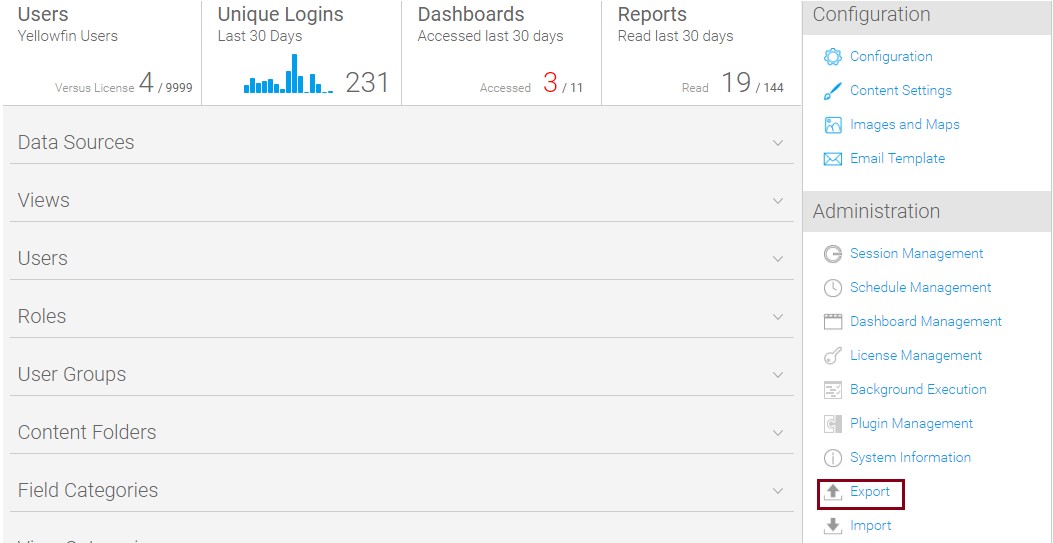
Step1: Go to Administration -> Admin Console
Then select Export option from Administration panel


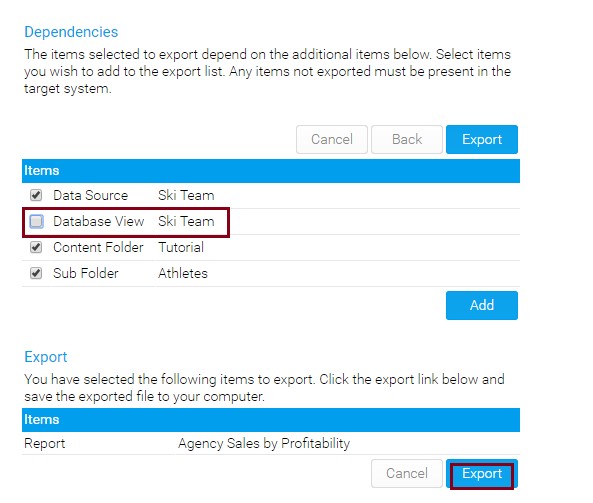
Step 2: Select the report which you want to change the report View.                                                                               
E.g.: “Agency Sales by Profitability”


Step 3: Deselect the “Database View” (It asks while importing the report)


Step 4: Import the Downloaded Report


Step 5: Select New Yellowfin View & then Next ..Next

Select the required view then proceed ahead


Done..Thank You!